
mercredi 23 mars 2016
My kart transport trailer.
I kept it simple, a simple deck with a couple to blocks to position the front wheels. All the tools and spare parts go in the car... which normally is my Porsche 924S. The cart is held in place by ratchet straps. I have to make sure all the kart parts are securely attached and nothing is left laying on the trailer before setting out.

jeudi 17 mars 2016
Ignition rotor puller.
I adapted my automotive ''Harmonic balancer puller'' for this task. The bolts with puller are not usable so I made a couple of bolts from 6mm threaded rod stock.


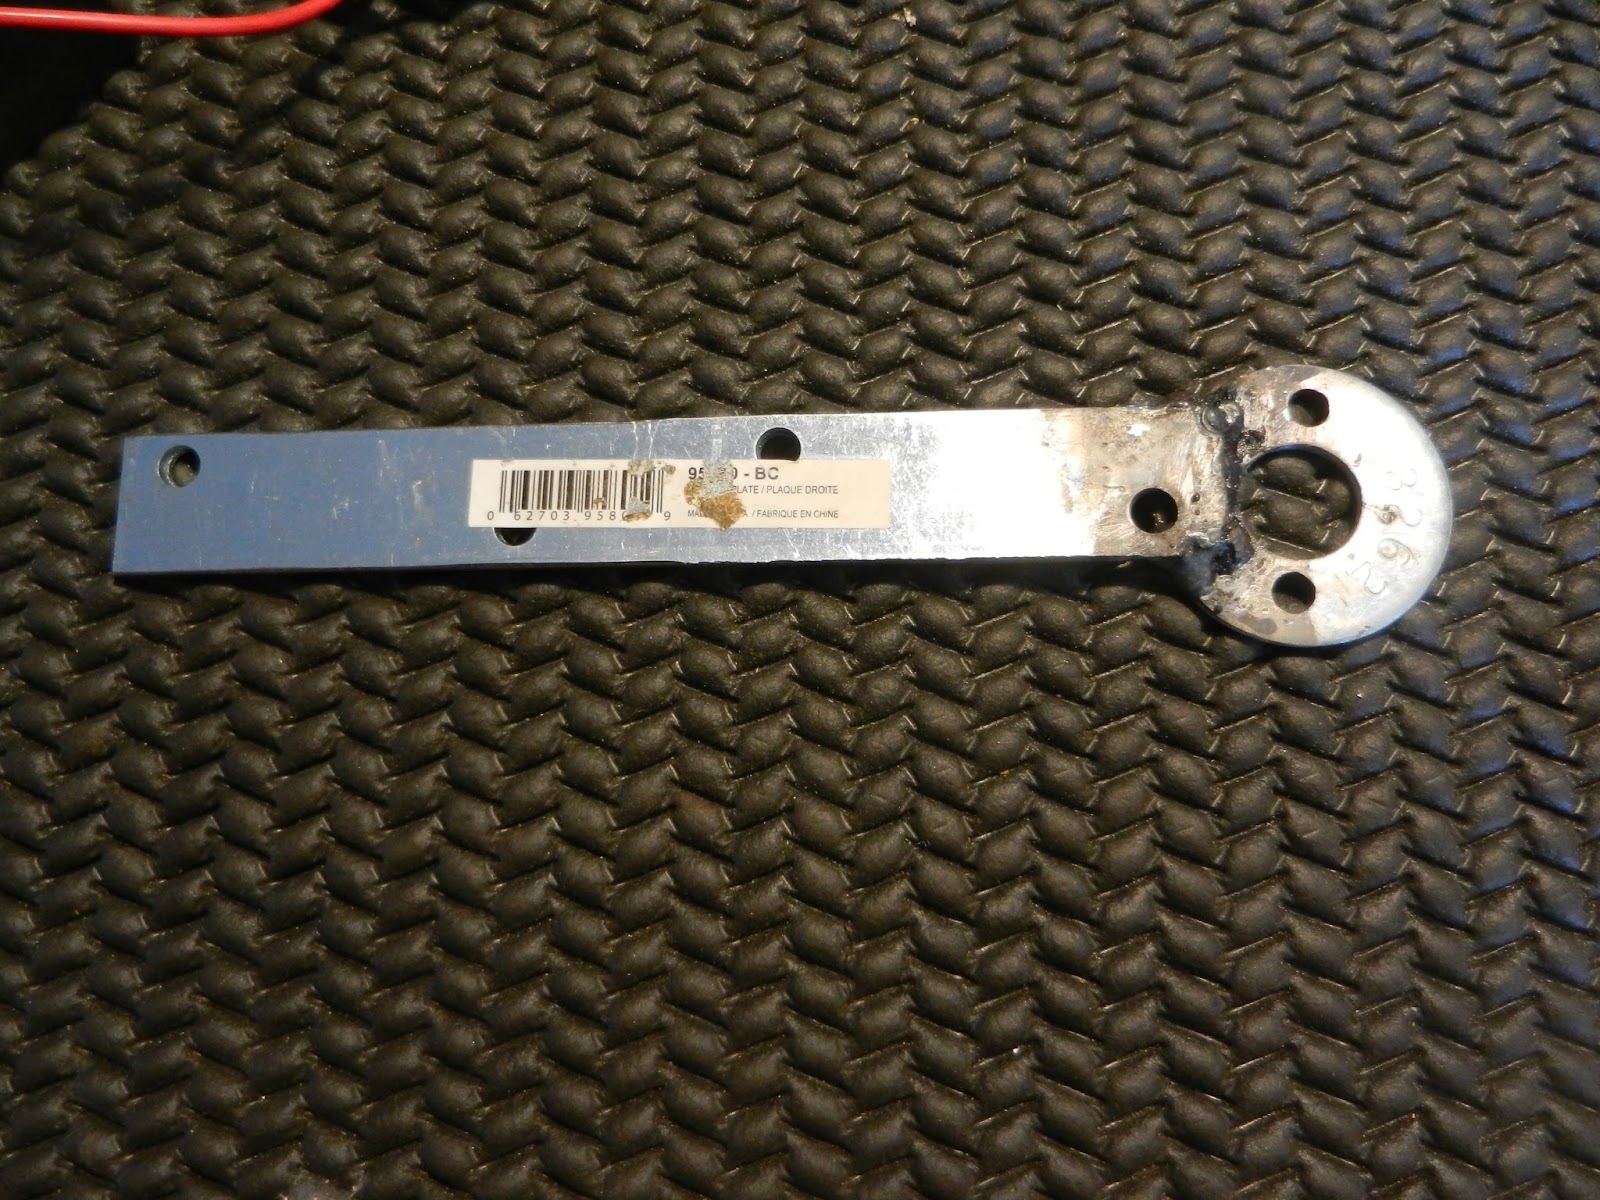
Wrench to hold the rotor for loosening or tightening the ignition side crankshaft bolt.
I made this tool from a 3/4 inch (inner diameter) washer welded to a piece of steel for a handle. There are 2 holes drilled to allow it to be bolted to the rotor.


jeudi 3 mars 2016
Sprocket puller.
I am still working on this. The 50$ US price of a real one has me searching for a cheap alternative. I am trying to be able to use my standard claw puller with and adaptor.
This is my first attempt, it worked on the sprocket of an Ital Sis, but on a Rotax sprocket that was really stuck the mild steel plate just bent.


Next I tried this bearing puller... but the bevel on the puller only contacts the ends of the teeth and so all I got was a second broken tooth on the sprocket. I would have been upset if there had not been one tooth missing already.


Next I tried this bearing puller... but the bevel on the puller only contacts the ends of the teeth and so all I got was a second broken tooth on the sprocket. I would have been upset if there had not been one tooth missing already.

My latest attempt is made from square tubing 1 1/2 inch square tubing, 1/8 of an inch thick. In the third picture you can see how it fits over the sprocket and how the claw puller is installed. This one seems to work, but I have still not been able to get the sprocket off the Rotax. Despite applying a lot of pressure the sprocket hasn't moved, but at least no more teeth broke off and the puller has not bent.
I am going to try heating the sprocket while the puller is pulling on it...


Piston wrist pin puller
Actually a pusher not a puller...
This is my clunky solution... I have seen much nicer metal home-made pullers but have not got around to making one because the metal work takes more time than wood work... this might be of use to someone anyway.
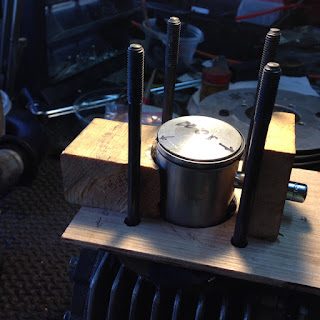
Here is the apparatus, the block on the left is just to guide the deep socket that is used to push the pin out. The hole in the block on the right is where the pin is pushed into. The base has 4 holes that the cylinder studs in the crankcase pass through.

Here it is placed on the crankcase with the deep socket in place. Make sure that the socket is small enough to pass through the piston hole and large enough to engage the pin. Make sure the circlip is removed on the side that the pin will exit!

Before installing a piston pin place a circlip on one side... then insert the pin from the other side and push it flush with the circlip. Heat the piston and put the pin in the freezer for awhile, put some oil in the hole and it will slip right in just using hand pressure, with a socket to get it seated against the circlip, but work quickly to maintain the temperature difference... and wear gloves the piston is hot!
This is my clunky solution... I have seen much nicer metal home-made pullers but have not got around to making one because the metal work takes more time than wood work... this might be of use to someone anyway.
Here is the apparatus, the block on the left is just to guide the deep socket that is used to push the pin out. The hole in the block on the right is where the pin is pushed into. The base has 4 holes that the cylinder studs in the crankcase pass through.

Here it is placed on the crankcase with the deep socket in place. Make sure that the socket is small enough to pass through the piston hole and large enough to engage the pin. Make sure the circlip is removed on the side that the pin will exit!

Here you see the adjustable C clamp in place. To push the pin all the way out you have to add an extension to the socket once it is flush with the guide block... unless you have a very deep socket.

Before installing a piston pin place a circlip on one side... then insert the pin from the other side and push it flush with the circlip. Heat the piston and put the pin in the freezer for awhile, put some oil in the hole and it will slip right in just using hand pressure, with a socket to get it seated against the circlip, but work quickly to maintain the temperature difference... and wear gloves the piston is hot!
Crankcase compression testing.
This is pretty simple, you need to seal carb and exhaust ports then introduce compressed air into the engine and see if and where it leaks out. I put the sealed engine into a tub of water and look for bubbles. I've found leaking crankshaft seals, a bad cylinder gasket and leaking rotary valve covers.
The blanking plates are made from aluminum plate with rubber gaskets from an old inner tube.
To introduce the compressed air I first installed a bicycle tube valve JB welded into the exhaust blanking plate but found that the access was difficult if I tried to turn the engine in its bath water to see various potential leak areas. So then used the base of a spark plug with a more sophisticated bike inner tube (Presta) valve that I got for free from my local bike shop... they have lots of old tubes that they throw away. The valve is an easy fit, injected epoxy to fill the cavity between the valve and the spark plug and put a washer and nut on to hold it in place. Since I don't have a Presta air pump I added an adaptor for a regular air pump.


Here is a tip on how to "disassemble" an old spark plug.
https://youtu.be/ziWcLDL-g_E
S'abonner à :
Commentaires (Atom)